My spoke tension gauge has helped me get a more even tension for the spokes on each side of a wheel than I was able to achieve by plucking the spokes. But I've never trusted the tension conversion tables provided by companies, even if their gauges look the same as mine.
A slightly different pivot bushing or spring and the kg tables aren't correct
(click on all images to enlarge)
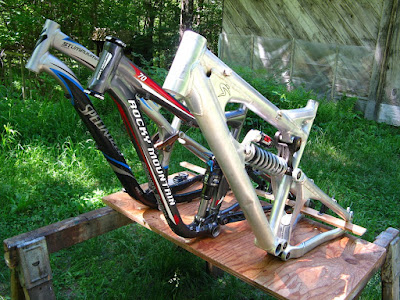
I have the Deckas version, which was affordable, smooth (after a few drops of oil), and quick. It's worked well. But last winter in my quest for knowledge, I bought 3 full suspension frames, (because no one I know would let me touch their bikes), and took them apart to study the pivots.
A Stumpjumper, Altitude, and VP-Free that now need wheels
With 6 wheels to build, it would be really handy if I could use my tension gauge to measure absolute tension instead of just the relative tension between spokes. I found Dan Burkhart's video about his calibration jig for a spoke tension gauge:
Dan Burkhart's DIY spoke tension meter calibrating device
video on YouTube is a good read
Spoke tension is often recommended to be between 70 to 140 kgf (154 to 308 pounds), so I got a 300 kg digital scale (200 kg would do) that used standard AAA batteries and appeared to have decent accuracy (claiming the OIML R76 standard) and 0.1 kg resolution. It would be possible to hang the scale and simply wire a spoke to the hook, and then wire a 5 gallon bucket to the bottom of the spoke to fill with metal bits for weight and skip building a test fixture. However I decided that repeating the test once in a while (for example after dropping my spoke gauge), as well as calibrating different spokes, would both be much easier if I had a calibration fixture.
My spoke tension calibration fixture is easy to build
Looking through my scrap metal pile, I found a nice 2" x 2" x 28" long x 0.094" wall square tube for a backbone for my jig that looked rigid enough to give reliable results. It came off an old exercise machine. People put them out by the road hoping someone will take it after they've realized it's just taking up space, and when I see one that has been sitting outside for a month or two I sometimes pick it up if it might have useful parts. This tube for leg lift weights was the right length and even had 1/2" holes already drilled in one end for slipping a bolt through, it seemed to be waiting to find a new and more useful life.Mounting the scale to the tube
After sliding a long 1/2" bolt through the tube holes, the spoke had to be 1.25" above the frame for my Deckas spoke gauge to fit, so I used a short piece of automotive rubber coolant hose pushed over the bolt as a spacer. Another short piece of hose between the scale and the nut provides some give that lets the scale move for alignment so that the load cell inside it doesn't get twisted and give false readings.
Connecting the scale to a spoke
Since the scale was built with a hole for a hook, a stirrup with a plate for the nipple was a natural connector choice. I kept the U bolt narrow to reduce the spring, but made it long so that I could get my fingers and a nipple inside. It's 1/4" rod, with a 5/16" thick cross plate that can be changed out for different spoke ends.
Connecting the J bend to the threaded rod
A simple plate as thick as a hub flange with a 2.6mm hole is all that's needed to connect the J bend. Because I wanted the plate to be changeable to plates for other spoke styles, it's held with a removable 3/16" pin in a slot that I cut into a threaded rod coupling nut with a 1/8" grinder blade. One problem I can see with Dan's fixture is rotation of the eye hooks as he adjusts the tension. The red plate in this picture that is sandwiched between the coupling nut and a lock nut is an anti twist shoe that slides along the main tube to prevent this rotation. It also helps hold the threaded rod in position while installing spokes.The anchor for holding the threaded rod and an alternative mount
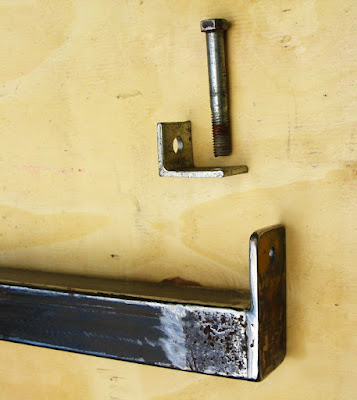
I had a short piece of 2" wide x 1/4" flat bar, and after drilling a hole for the threaded rod 1.25" up from the main tube, I welded it on the end. However if you want to make this fixture without welding, a substitute could be bolting on a short cross piece of ell angle iron. I used 7/16" threaded rod because I had a short piece, but 5/16" or 3/8" would probably work considering that a spoke is around 2.0mm. A smaller diameter rod would have a finer pitch which would make adjusting tension more precise, I found 1/8 turn of the nut gave about 10 kg change. However I put all the test results into a spreadsheet and derived an equation, so it wasn't necessary to aim for exact tension numbers or gauge readings. Either method should produce a good conversion table, but I'll say that my digital scale took well over 5 seconds to settle and making many small adjustments to reach a particular number could be tedious.
The first round of testing- how well does it work?
I clamped the jig to a table top with woodworking clamps while making tests, but with it's square main tube it could also be held in a vise. It turned out to be easy to adjust with one wrench, and had excellent repeatability regardless of tightening or loosening direction, suggesting that these components are very rigid with little spring, and the scale is of reasonable quality. As time goes on though I expect to compare the digital scale against others to be sure it isn't drifting.Deckas test results (green and black lines ) show very low scatter and good repeatability
These test results are for 2.0mm (14g) round steel spokes because they are common on my projects.-the green line has 42 measurements on a used galvanized 307mm long spoke
-the black line (so close that most of it is hidden under the green line) has 54 measurements on a new stainless steel 256mm long spoke
-the blue line has measurements taken from the Park Tools TM-1 tension gauge table
The TM-1 reads lower for a given kg tension than the Deckas, which supports my concern about using tables from other companies. The adjusting screw on the Deckas looks like it could be backed out one turn which might then match the TM-1 readings, but the ranges and slopes also don't match well. In the range from 70 to 140 kg:
-Deckas readings go from 26 to 30 (8% of the scale) and change 0.5 per 10 kg
-TM-1 readings go from 20 to 26 (12% of the scale) and change 0.9 per 10 kg
If you want to be very exact with either one you're going to do a lot of squinting because of the small change per kg. Also neither gauge is useful below a reading of 15 or over 30.
Best fit equation for the 94 measurements from the Deckas
(Warning I've swapped the axes compared to the first graph)
If clicking on the image is still too small to read, save the image to get a jpg that can be enlarged
I combined the measurements of the stainless steel and the galvanized spokes because they were basically the same curves and the greater number of data points would increase accuracy. The SciDAVis program was used to plot and calculate the best curve to fit the points, and the equation then used to calculate the kg of tension for each reading on the tension gauge.Here is the equivalent Park Tool TM-1 equation using their table data
The TM-1 table data lines up so well that Park Tool must have also stuffed their data through an equation to smooth it out. A benefit of using an equation instead of directly measuring a scale reading for calibration is that it removes erratic readings. This illustrates though that any stickiness while taking a spoke measurement could greatly affect your results.
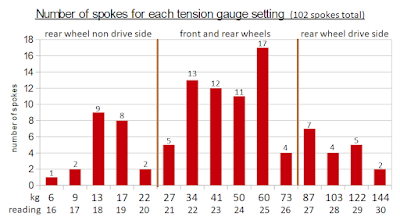
52% of the spokes on my bikes are between 34 to 60 kg tension.
Looking at the 10 to 20 kg steps between each scale number and knowing that the gauge has still been a big help made me wonder just how exact do I have to be? Do I need a digital readout spoke tension gauge for better resolution? So I measured the 5 bikes I've been riding for years. These wheels are straight and stable, even though I routinely carry 40 to 100 pound cargo loads on dirt roads at ebike speeds. They failed tension tests miserably, with only 9% in the oft quoted 100 to 120 kg range, and the tensions were all over the map, from 6 kg to 144 kg. Readings of 28 to 29 on the drive side of a rear wheel often paired with readings of 18 to 19 on the non drive side (a difference of 90 kg), and this doesn't require squinting at the scale to see. The kg steps between the scale numbers are small in comparison with reality.
Around 120 kg seems to be a common upper tension limit for the rims I use
Note: I assume 1kg = 1kgf = 10N for easy calculations
Now that I have a reliable calibration for my tension gauge, I can see that the spokes on my bikes could be a little tighter. The average tension of the 102 samples is 50.7 kg and I could aim for 70 to 80. But some rear drive side spokes are already close to rim limits, so it shouldn't be much tighter. (Cycling News wrote an instruction page for the Park Tool TM-1 that has a table listing many rim limits: http://autobus.cyclingnews.com/tech/fix/?id=tm_1 )Thinking about people on forums saying that their wheels loosen up but that my wheels have been stable, my thought is that the load on a wheel doesn't matter as much as the impact, since I carry heavy loads but I don't jump or bash through rock gardens. One other consideration for increasing my spoke tension is that many of the nipples on the older wheels are dry and hard to turn even at lower tensions, and only the wheels I've built with grease or antiseize can reliably reach over 100 kg tension. Given the real world range of spoke tension on my bikes, I don't feel the need to get a digital spoke tester until my eyes get a little older and the gauge scale becomes even harder to read. I might try making a clearer label for the scale, or even making a new gauge arm with the measuring post closer to the the pivot to increase the pointer displacement. For how easy it was to make though, this calibration fixture provided a noticeable step up in my wheel building that was equal to getting a spoke gauge, and I think the quality of the last few wheels is getting pretty decent while taking less time.


Thanks for sharing a great blog. Want to buy Eunorau Fat-HS electric bike? Visit El-Bicycle. It's a super cool e-bike with lots of power, style, and uses. It's great for adventures and daily rides. Call El-Bicycle at 19294746067 to try it out or learn more. Get ready for a fun e-bike ride with the Eunorau Fat-HS!
ReplyDelete