
I used a 3/4" EMT electrical conduit bender that had a 5 1/2" center line radius. Since I would custom build my trailer, I simply used a 1/2" bolt with the head cut off sticking up from the plate for a connection pin instead of a more standard bicycle hitch. A common Heim joint mounted on the trailer tongue can then be slipped over the pin and secured with a hairpin spring clip through the bolt. This setup is much less expensive and stronger than a standard bicycle hitch.

I started the kickstand by fitting a template cut out of cereal box cardboard to the bottom frame tubes. Using this type of cardboard works well because you can bend or fold it for fitting 3 dimensional patterns easily, but you can also draw grids on it when it's flat to keep the pattern square and straight. You can then use it to line up the parts for tack welding them together. I like to build the kickstand so that it lifts the tire only 3/4" off the ground. Some people prefer 2" to 3" in case the kickstand sinks into the ground, but I think that just makes it harder to use. I prefer to add foot pads to the legs instead.
I've now built 4 heavy duty kickstands, and while they all work OK, I don't think they are particularly good designs. I've started to think it's one of the hardest parts of a bike to design well. If I want to know if someone is a good bike builder, I've now started to look at their kickstand.

With the tires temporarily installed in the frame for measuring the kickstand height, I noticed that I had miscalculated the chain line and two diagonals were in the way. Oops. I cut out enough to clear the chain and replaced it with an ell piece that has a brace on the backside to stiffen it. This gave me a chance to test my weld- I squeezed the cut out tubes together at the top, and they crumpled without the weld at the bottom giving way.

Besides the chain line repair and the kickstand, I started adding other tabs, such as a bracket for chain idler sprockets, and tabs on the hoop for attaching the plywood foot boards.

The foot support hoop was propped up level and tack welded at the front to hold it in place. Then I added two diagonals at the back running up to the rack, followed by stays to the rear dropouts. I ran braces from the dropouts sideways to the hoop to take the side forces, but had to make two compromises- they had to be moved backwards because the right one interfered with the derailleur, and I had to use a sharp mitered corner to fit the tube under the plywood foot board. The corner hasn't been a problem though because the sharp points are hidden away from most activities.

I also fit cross pieces to the rack for attaching it's deck board, and included a downward ell on the rear piece for attaching a light. However I ended up replacing the reflector I had there with a much brighter LED truck side marker light, which I attached to the fender with automotive double sided foam trim tape. All of my bikes have a small 15 watt DC to DC converter to convert the battery's 48 volts down to the automotive 12 volt standard, and regular car components like lights and GPS can be wired in. I'm planning on adding a 5 volt USB port next, so that riders on a trip can recharge their cellphones or notepads.
I knew that I wanted the bike to be a sunny solar electric yellow, but didn't want it to look like a bumblebee with black fenders. Two of my great grandparents are from Ukraine, and I decided to use the sky blue from their flag on the fenders and battery box. However in Vermont we have long winters, so everyone here thinks the colors look like a Caribbean vacation,..

The brushed on acrylic latex enamel leveled out OK, but I sprayed the next Cruising Oma bike and it came out looking nice, like it was powder coated. I'm trying to use water based enamels that have some urethane in them, but they are hard to find, most often that formula is only available as a clear coat.

Instead of using nuts, I threaded all the tabs. I had predrilled all the screw holes in the tabs, but left tapping the threads until after painting because they would have been clogged with paint. This way I was also able to clamp the foot boards in place and easily drill screw holes in them through the tabs, without having to mark out the holes on the foot boards. In a production setting this step could be done with self tapping screws instead.

Decent power hub motors need to have the dropouts reinforced, or the axle will eventually twist around. My bikes are 750 watts, and one medium thickness torque arm on the left side will do. First I made a pattern that ran forward 4" from the axle centerline to a clamp wrapped around the chainstay. It goes above the chainstay, so that the drive torque will pull upwards on the clamp to keep it straight, and spread the clamp's force on the chainstay more evenly than if the bolt side of the clamp were pushing on it. I cut it out of a piece of 1 1/2" x 1/4" bar stock, working from the end towards the bar, so that the bar formed a big handle until the very last cut.

Clamp a piece of scrap on the arm to make a rip fence for the angle grinder.

The axle hole was drilled undersize and then fitted to the oval axle. I traced the oval hole from the washer that came with the motor onto the torque arm, and then filed the hole to match. I used a carbide die grinder bit to rough out the oval, but because I wanted more control I mounted it in a slow speed drill instead of a high speed die grinder.

With the torque arm cut out, it had to be bent inwards to line up with the center of the chainstay. I marked out the two bends and then used a cold chisel and a press to make the bends, but they could also be done with a vise and a pipe or hammer.

Next was a strap clamp to go around the chainstay, it's shown resting on the left side of the hammer. I wrapped a strip of cereal box cardboard around the chainstay, folded the ends upwards to fit the torque arm, and then traced the bolt holes through the torque arm hole onto it. After tracing the pattern onto a piece of stainless steel sheet metal, I drilled the holes, bent the ends up, and then rolled it around a bolt that was the same diameter as the chainstay. You could also use a tab welded on the chainstay instead of this clamp, but if you do make sure that it is wide enough to spread the load out. Chainstays are small diameter and can't resist much sideways bending from a point load, and the extra weight of a cargo bike makes the situation worse.

The finished torque arm takes the rotational force off the dropout.

The front fork legs did not have any tabs for mounting fenders, so I used the axle to mount it. I have used plain washers (unplated) for eyelets for the smaller 5 mm stay bolts, but for the 7/16" axle I cut out some elongated eyelets and welded them on the end of the fender stays.

All the physical components have been assembled, and now it's time to add controls and wiring.
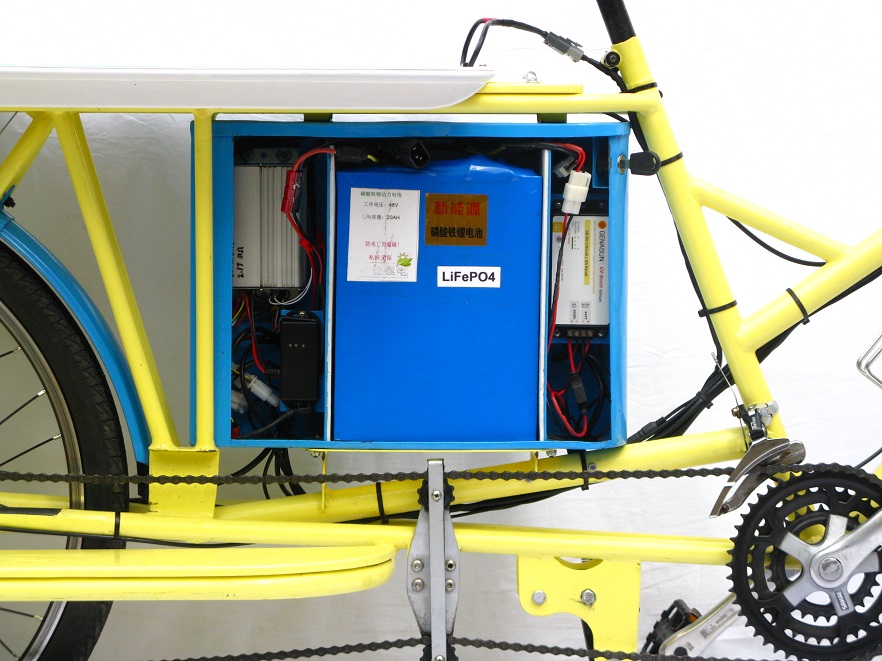
In the upper left corner of the battery box is the motor controller, and the small black box below it is an electrical data logger with GPS. In the center is an A123 cell type LiFePO4 (Lithium Iron Phosphate) battery (48 volts x 20 Amp hours, which is about 1 kWh). At the top front is the key switch, below it is the solar controller, and tucked in behind that is the 48 VDC to 12 VDC converter.
For the new Cruising Oma bike I'm switching to Panasonic NCR18650GA cells in a 52 volt configuration (14s7p), or about 1.25 kWh, which will be about 20% smaller and lighter. I also have 4 different new solar controllers to try out- the Genasun in this picture works well, but it is very expensive, and it can not deal with shading issues well if there is more than one panel on the bike. I would also like to use a different charging voltage than is available.

This bike is about 4 mph faster than the bakfiets on most trips, mainly because the bakfiets is set up for 36V, but also the aerodynamics are slightly better, and this hub motor has a faster speed motor winding. However the bakfiets has the top speed honor, coasting down Miller Hill at 46.7 mph, and this bike has reached only 46.5 mph. I think the bakfiets is faster when coasting because it has a gear drive hub motor with a slip clutch, and it doesn't have the drag when coasting that this bike's direct drive motor has. Because of the long wheelbase and the relaxed head angle, both bikes respond slightly slow, and they feel very comfortable at speed.

I originally intended to put a small windshield on this bike, but too many new ideas came along so I started building another bike instead. The basket has worked out well though for cookies, chocolate, potato chips, gloves, sunglasses, etc.

With the reflector mounted on the rack, before the LED truck side marker light was added down on the fender.

Before I got the canvas panniers, I used to have to choose between having the solar panel or a backpack on the rack. This load is for the 12 mile (one way) trip to recycling. Although the solar panel takes up rack space, I think it is important for fast, long distance bicycling and I'm working on fitting it in better. The battery alone gives me about 65 miles at an average speed of 16 to 18 mph, and the solar panel allows me to move the average speed up to 20 to 22 mph and have the same range or more. To give you an idea of the maximum solar boost possible, I took one 57 mile long trip last summer on a clear bright day, and when I recharged the battery back at home I found I'd only used a little over 1/4 of the energy. If I had wanted to I could have gone 190 miles before the battery was empty.
This comment has been removed by the author.
ReplyDeleteThis comment has been removed by the author.
ReplyDelete
ReplyDeleteGood article which really illustrates the wide range of options and prices depending on what type of bike you want and how much you want to spend. Of course, it also demonstrates why Luna is pissing off everyone :)More info visit Electric Bike website.
cargo bike rental I think this is an informative post and it is very beneficial and knowledgeable. Therefore, I would like to thank you for the endeavors that you have made in writing this article. All the content is absolutely well-researched. Thanks...
ReplyDeleterent christania bike Hey, this day is too much good for me, since this time I am reading this enormous informative article here at my home. Thanks a lot for massive hard work.
ReplyDeleteHi Dear,
ReplyDeleteI Like Your Blog Very Much. I see Daily Your Blog, is A Very Useful For me.
cargo bike rental Reserve best luxury motorcycle rental, bike rental service, rent a christania. Enjoy best place in Miami via luxury bike.
This comment has been removed by a blog administrator.
ReplyDeleteIt is a good article Blog Thanks for sharing.
ReplyDeleteaccessories for electric bikes in CA
fat tire trike in CA
fat tire electric trike in FL
fat tire electric trike in CA
best electric trike in FL
best electric trike in CA
all electric trike in CA
electric trike in CA
electric bikes irvine