Showing posts with label Bafang BBS02. Show all posts

Friday, January 7, 2022

The Breeze, the Stratus drivetrain (S1E3)

From the start the Stratus was going to have an electric assist installed.  I'm in my fifth year without a car, in a rural area, in the middle of a transportation system that was 99.9% designed for cars.  The electric assist helps me compensate for the poor road design, the distances, and the nonexistent bus and train network.  Also, recumbents aren't as easy to peddle uphill, and there are plenty of hills here.  So I took most of the original drivetrain parts and stored them in a plastic zip bag in case the bike needs to be restored later on.

Because they can be shifted to different gearing ratios, I've found Bottom Bracket motors are more versatile than the hub motors I've used.  I knew the Stratus was going to be fast, but it also had to climb up my dirt road.  Because my state recently enacted the (questionable) 3 class ebike legislation and I wanted to stick with 750 Watts, I decided to use a Bafang BBS02.  It's more powerful than the 500 Watt Tongsheng TSDZ2, and not as heavy as the Bafang BBSHD,

left to right: TSDZ2, BBS02, BBSHD (click on all pictures to enlarge)
Because these are all the same voltage (48V) and about the same motor speed, the size of the motor case is a pretty good indicator of their amps and power capacity.  I find the BBS02 will climb steep roads around 8 to 12 mph, but the TSDZ2 has to be shifted down one or two gears and is slower.  The BBSHD is a good choice for heavily loaded cargo bikes because it's built like a truck motor and can deal with the force and heat much better.

  I'd installed a dozen BBS02 which had been strong and reliable motors, but then the 13th motor had a manufacturing defect:

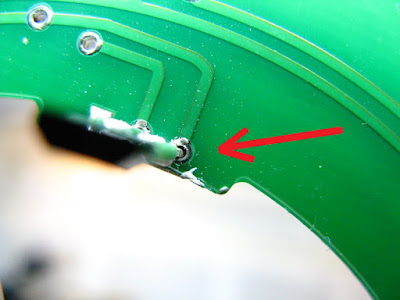
There were two dry solder joints on the Hall sensor printed circuit board of the 13th BBS02.  This was easy to diagnose because a 08H error code showed up on the display, and after removing the board the dry joints were visible and an ohm meter showed bad connections.  I fixed this by resoldering the joints because the vendor was slow in sending a replacement.  I consider this a significant fault, but otherwise the rest of the motor looked very well designed and solid inside, and I was willing to give the BBS02 another try.

Testing the Hall sensors to be sure it was the solder joint and not the sensors

The sensors themselves could have been bad, so I tested them before reassembling the motor.  With a voltmeter connected between the ground and the output of each sensor, the output should toggle between a high and a low voltage when a magnet (a magnetic screw holder in this picture) is passed by the sensor.  If you are trouble shooting this part and not familiar with doing this, please unplug the Hall board from the circuit and use a separate power supply.  Note:  these appear to be latching Hall sensors, and the magnet has to be flipped to the other side to change the polarity.  I had expected the vendor to send a replacement Hall sensor board so that it could be swapped easily, but they cheaped out and sent one single Hall sensor.  I don't think this would have helped most bicycle shops.  

This 14th motor has been working fine, it's smooth, quiet, and pulls nicely.  I reprogram the BBS02 motors mainly to turn the power down in the first and second assist levels for easy riding.  With these settings, the bikes ride a lot like the Specialized Turbo Como in our ebike library.  I also change a few other settings, such as reducing the starting current to prevent a large starting load from burning out the motor, but I don't do anything complicated.  There is a ton of BBS02 programming information available on the web so I'm not going to repeat it here.  (I use Penoff, Endless Sphere, EM3EV, Karl Gesslein, Lectric Cycles, and Lunacycle suggestions.)

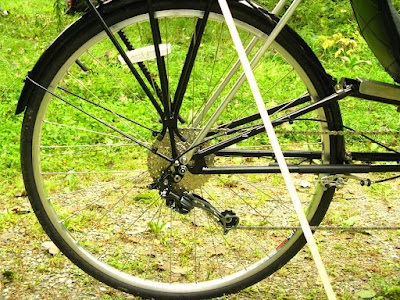
The new rear wheel setup, with a 126mm freehub, 9 speed 12-36T cassette, and a rear derailleur capable of a 36T granny gear.  (The stick is because I hadn't installed the kickstand yet.)

The Stratus has a 27 x 1 1/4" (32-630) rear tire which is one of the larger diameter wheels, and the original gears were a two speed chainring (52/42T) and a six speed freewheel (13/14/17/21/26/32T).  I needed to keep the 52T chainring for speed, but wanted to add a larger granny gear to make up for the single large chainring.  Almost all Shimano rear derailleurs in my price range have a maximum granny gear capacity of 34T.  I had experimented with a short hanger extension on my Marin MTB conversion, but I had to drill and insert a peg to correct it's angle to Shimano specs.  It worked but it wasn't easy or elegant.  The Shimano Deore M592 rear derailleur has a 36T maximum, so I decided to try it without a hanger extension and see if the motor made up for having less than a huge granny gear.  It will climb a 16% grade OK, but it's a couple mph too fast in rough, bumpy spots.  If this setup lasts, I might experiment with a 10 speed setup to get a 40T or 44T low gear, but there are a few considerations with doing that:

-Many people talk about the torque of a mid motor ebike wearing out chains quickly.  I've been using wider 6/7/8 speed chain, and the wear has been so minimal that I decided to try out 9 speeds for this bike.  But 10 speed chain would be thinner still.
 -Six to nine speed parts are somewhat compatible and I can mix and match some parts while building, but I wouldn't be able to use any of my spare parts for a 10 speed.  The cable pull and the parallelogram angle are too different.
-I've been buying quality regular chains for about $14 each, but have found a comparable ebike chain was $42.  Since the Stratus uses 2.1 normal length bike chains (246 links) and The Breeze will be similar, there is some financial motivation to design for a low wear drivetrain that can use a regular chain 

No one ever talks about using larger gears to reduce the stress on a bike chain like the industrial drive people do for machinery.  At first glance having only a 52T chainring seems like a bad idea, but if it's paired with large rear cogs then it's actually beneficial.  Besides less stress on the chain, I use the lower gears more often than with a 44T or 48T chainring which spreads the wear around.  I'm also becoming less and less of a fan of 11T top cogs because I've noticed chains jumping on them more often, so they seem to be not a great idea for a strong mid motor ebike and 12T or 13T high gears are better.  In general I'm leaning towards larger diameter gears, while still trying to keep a very wide gear range on the cassette.

The original Suntour Mountech rear derailleur has an extra spring loaded pivot that is concentric with the upper idler pulley.  This was famous for packing full of dirt, and then jamming the derailleur into the spokes.  It was called "The wheel builders best friend" by one blogger, and was responsible for much of Suntour's financial problems.  It went into the storage bag with the other original parts.

The Stratus rear dropouts have a 125 mm spacing.  I wanted to upgrade to a stronger freehub with more speeds, but all my MTB parts hubs had a 135 mm OLD dimension.  Since the seat and chainstays are very long and slender on the Stratus and the frame alignment measured true,  I didn't want to cold set the stays and take a chance of it becoming off center.  I found a wheel with a 130 mm Shimano FH-RS300 hub, and it even had a 4 mm spacer on the left side!  After removing the spacer and recentering the rim 2 mm over to the right, I had a 126 mm wheel that fit into the dropouts almost nicely with just a light nudge.  Unfortunately the chain did not fit.

The inside of the right rear dropout had to be modified to clear the chain.  The seat stay tube (top) stuck out too far and had to be cut back and then rewelded closed.  The tube had grooves already worn in it by the old chain, so this probably was a problem even when new.

The finished seat stay with decent chain clearance in high gear.  Originally the stay was a tube all the way around.

1/2 inch black poly tubing instead of idler pulleys (shown with the chain on the top sprocket)

There were a couple more small modifications.  One was that I needed to extend the speed sensor cable.  The bike was almost ready to ride and I didn't want to wait for another order, so I cut 28 inches out of a USB cord and spliced it into the cable.  It looked the same, plus it was shielded.  I filled the splices with silicon sealant before putting the last piece of heat shrink tubing over them.  The other mod was the chain stay protector.  I'd planned on making an adapter in front of the rear wheel that could mount both the kickstand and chain idler pulleys.  However because of the 52T chainring, chain rub on the stay was not a problem.  The kickstand was also more stable when located further forward.  So I took a 6 inch piece of black poly 1/2 inch plumbing tubing and cut a slit in one side, and then snapped it on the chainstay just to protect against rubbing when the chain was bouncing around.  It's light, and I've never heard it make any noise.

This bike is a treat to ride.  It takes a little effort to get it up to 25 mph, (there's some weight, and I should probably revisit the motor programming), but then it will stay cruising at 25 to 30 mph with not much trouble.  The one problem I've had with it is getting started with 60 pounds of groceries on the rear rack.  I don't have a hand throttle on it, (there wasn't any room left on the handlebars!), and I've found that if you use the walk assist mode to get going, the motor will not stay running when you start pedaling.  I need to make a start button to turn the motor on until I get balanced and pedaling.  Overall it's exciting to ride, and it's probably the closest I'm going to get to a high performance sports car with 9 speeds with paddle shifters on the back of the steering wheel.

I'll write one more post that will cover the battery and remaining details that make this bike work.


Saturday, December 25, 2021

The Breeze, or learning how to travel (S1E1)

Advertisement for a Danish Sofa-Cycle, circa 1930's, credit: unknown

 I've wanted to build a sofa cycle for 4 or 5 years now.  The main reason was comfort- to be sitting looking fowards instead of down, and to have my feet flat on the ground when stopped.  There was also a hope for better efficiency from a smaller aerodynamic profile.

But other bikes kept sidetracking me.  I've now put motors in 24 bikes and have 4 more lined up, (the motors I've used are 3-MAC geared hub, 1-MXUS DD hub, 2-Leaf DD hub, 2-generic 250W DD hub, 14-BBS02 BB, 1-BBSHD BB, and 5-TSDZ2 BB motors).  Plus there have been a few extra projects such as the DIY ebike workshops, our Upper Valley ebike library, and rebuilding the battery pack in a Twike (which had 1568 cells to weld together!).  It seemed like I'd never get to building another frame.

I'd started in the direction of a lower seat with the Oma bike (see links to blog posts on the right).  But the Oma bike had 3 significant problems:
-I'd used too small tubing which flexed a lot and I constantly had to pay attention to balancing
-the motor pulled the rear wheel out of the dropouts and needed repairs
-it's very long
So I ended up not using it very much, and wanted to try building again.

There were several times that I almost bought a RANS Crank Forward bike ( http://www.ransbikes.com/ ) just to move things along.   But then I'd see something like this:

Bram Moens rides his M5, www.m5-ligfietsen.com
Credits: photo-Frans Lemmens, book-The Recumbent Bicycle, Gunnar Fehlau, 2000, Out Your Backdoor Press

Then I'd think I could do better than a crank forward.  What if Bram had a solar panel over his head, another panel over his knees, and a slightly stretched frame with large cargo bins centered over the rear wheel?  I'd have a vehicle that never needed charging and had some weather protection.  So over the last few years, I've figured most of the design out.  A monotube frame with a strong arch over the rear wheel for the cargo bins.  A motor under the seat, and a new solar setup.  I've collected most of the parts- the tubing, wheels, group set and other hardware, a BBSHD motor, rear shock and bearings, plus few extra parts for experimenting with a Hossack front end.  It's taken long enough that I've even got a theme song- 

Call me the Breeze, J.J. Cale, Cain's Ballroom, Tulsa, (2004)

But other projects keep popping up.  They've been good experience, for example I can now build a wheel in an hour or two instead of a whole day.  And I've put in some serious time on bicycle advocacy, learning our transportation system, and speaking up for non-car users here in Vermont.  Still, my frame is going to have to wait for a second Series of blog posts.  First I have a detour that qualifies as The Breeze, Series 1.

Last summer there were again too many projects for me to make the space I needed to work on the last details of building my frame.  At the same time, my friend Bill decided to clean out some of his bikes, and one of them was a RANS Stratus recumbent.  My design+build is half calculation and half intuitive- my cells absorb the situation, and then my hands unconsciously build.  The calculations are mainly a double check that it's feasible.  I had the idea that it would be helpful to experience a bike with a lower seat before I built my frame.  I also had a stack of 18650 cells left over from other projects. So Bill and I swapped parts.

1985 RANS Stratus A, with BBS02 motor

This turned out to be a pretty nice and quite fast bike, and very suitable as a local car replacement.  The motor takes care of the usual recumbent hill climbing problem.  It's able to comfortably carry a medium load of groceries (50 pounds).  I'm continuing to learn how to travel.  The bike needed a bit of work, and I'll run through the process in the next few posts of this first series of The Breeze.

Saturday, December 26, 2020

DIY E bike Conversion Workshop- step by step video and tips

A little over a year ago I wrote about a couple of DIY workshops we had held on converting a regular bike to an Ebike.  The first half of that post "Converting a regular bike to an ebike workshops" was primarily from a workshop organizer's point of view and didn't have a lot of instructions for doing the conversion, (although the second half did have tips from a 2 page handout that we used at the workshops).  This post is meant more for the DIY person, and has information that I've learned from converting 17 bikes so far, and holding a third workshop.  I've written a brief history of events leading up to the workshop, then there's a short summary of my currently preferred parts, and then the workshop video (1 hour 26 min) covers about everything, ending with a few short notes about tips that I forgot to include in the video.

Converted Finiss MTB with a Bafang BBS02 motor with lights and P850C color LCD display ($442), 48 Volt x 17.5 Ah (840 Wh) down tube battery ($422) and new chain ($16).  Total of $880 (includes VT tax and shipping, NH residents would pay 6% less).

Why DIY?
If you are the type of person who likes to work on your house or your car, you can build a very nice Ebike with specs that are better than most Ebikes on the market for under $1000, resulting in significant savings and a custom ride to fit your needs.

First a little bit of the background story leading up to this DIY workshop: the UV EV Expo and the UVEL.  If you just want to work on your bike, skip to the next section.
Here in the Upper Valley of the Connecticut river in Vermont and New Hampshire, our group of energy committee members have now held 5 UV Electric Vehicle Expos.  (I wrote about the first one back in May 2014 in this post "Upper Valley Electric Vehicle Forum and Demo".)  These developed into a very big outreach for us- to give you an idea of the effort there were usually around 2 dozen vendors and exhibitors, speakers, food, (and of course Ebikes in every one), here are the attendance totals:
2014 Norwich, VT           250 people
2016 New London, NH   350 people
2017 Hartford, VT           550 people
2018 New London, NH   375 people
2019 Hartford, VT           550 people
These were most likely the largest EV events in New England each year, and it was actually nice to have a break in 2020 when COVID restrictions were imposed.  However we still had a little bit of money left from the 2019 budget, so we decided to use it on an Ebike library (with disinfecting the bikes, distancing, and masks the safety precautions turned out well).  Back in 2010 when I was just starting to figure out Ebikes as a substitute for my car, Dave Cohen of VBike down in Brattleboro was also starting work on a consulting service for ebikes.  He arranged for a few Ebikes that he could loan out for short trial periods to people who wanted to see if an Ebike would fit into their lifestyle.  After a few years of doing this, our statewide bicycle organization Local Motion up in Burlington ramped up the concept into a widely available library of several Ebikes.  However the bikes were often not in the Upper Valley, and we Expo people decided we needed our own library.  With Local Motion's help, we combined our Expo funds with donations and bought a Specialized Turbo Como 3.0 ($2800), a RAD Wagon longtail cargo bike with a child handrail ($1800), and I converted a Specialized Hard Rock MTB ($977) for loaning out.

The DIY Specialized Hard Rock conversion for the UV Ebike Library.  It has a Tongsheng TSDZ2 500 Watt motor, a 48 Volt x 14.5 Ah (696 Watt hour) battery, with new tires, brakes, chain, lights, fenders, rack, and mirror for $976.96 (including VT tax and shipping).

The Parts:
At this point I've installed hub motors (MAC, MXUS, Leaf, and generic cheap ones) and bottom bracket (BB) motors (Bafang and Tongsheng).  I'm finding that the BB motors work all around the best.  These have been my preferred parts for the last dozen bikes:

Motors (both of these are street legal in VT and NH):
First choice: Bafang BBS02 48V, 750W, 120 Nm torque, about $435.  This is a very good, strong motor, and I recommend it for riders who are experienced, carry loads, or have distance to cover.  By programming the first two assist levels to be less, this motor on the Finiss bike conversion feels pretty close to the Turbo Como bike in our library, while still having more power at the top assist level.
Second choice: Tongsheng TSDZ2, 48V, 500W, 80 Nm torque, about $365.  This is a good quality motor. and because it has less output and a torque sensor it is very smooth and an easy ride.  I recommend it for beginner riders or people who haven't ridden in a long time, smaller bikes, or shorter distances.

Batteries
Bike handling is better using a down tube battery than one in the rear rack.  I'd now use a rear rack battery only if I needed 1 kWh or more of capacity, or a battery couldn't be fit any other way.  The latest down tube Reention DP-6 case with 4 mounting tabs down each side plus heavy duty flat contacts (drain water better than round) and a full length aluminum mounting channel is a very nice package.
First choice:  48V x 17.5 Ah, (840 Wh), about $405
Second Choice: 48V x 14.5 Ah, (696 Wh), about $320

Workshop step by step video
All the bikes held up well over the season with only minor repairs, (there were about 230 borrowers from 7 towns), and the Hard Rock generated a lot of DIY questions from people who wanted to convert their bike.  We decided to hold one more DIY conversion workshop, but this time we had to hold it online because of COVID.   Norwich Energy Committee arranged with our local Community Access TV to film a step by step conversion that I did outdoors in the doorway of my barn for COVID distancing, and once that was edited we used the video for a Zoom meeting.  (A thank you also to Norwich Women's Club for funding parts for one of the bikes!)  This recording covers much more than I could write in this post, so I'm going to go straight to it, and then end this post with six small tips that I didn't cover in the recording.


E Bike Conversion Workshop

The tips that I forgot to include in the video are:
-On a Mountain Bike often the shifter cables are routed through a plastic guide underneath the bottom bracket, and this guide sticks out so far that the motor won't slide in.  Remove the guide, and then route the cable to the rear derailleur through a piece of cable housing running over the top of the BB instead.  You can keep the factory cable housings at the handlebars and at the derailleur, and just cut a new piece that fits between the cable braze ons on the downtube and the chainstay.
-Do not convert a carbon fiber bike, tightening the motor nuts may crack the bottom bracket.
-Roughly half of the bottom bracket motors have loosened up the large retaining nuts after riding a couple hundred miles.  After a second tightening they have stayed tight.  I now use the upper end of the recommended torque range for the nuts instead of the middle.
-I didn't say enough about the Tong Sheng speed sensor- it is very sensitive to the gap, requiring an extremely large one of 10 to 15 mm.  I've had to mount the magnet on a spoke on the other side of the wheel to get this gap.
-The motor gear housing on one of the dozen bikes with BB motors pressed against the chainstay when the large nut was tightened up.  Some people dent the chainstay in for clearance, but a better way is to use shim washers on the motor.  (The Chinese vendors often call these narrow washers "gaskets".)
-Several people have asked if the Bafang motor could be made slow for puttering along.  This is easily done by simply turning the assist off, but for those who wish to have a tiny bit of assist, I've reprogrammed the first (and sometimes second) assist levels to about half of their original settings.  This has turned out to be the main motor programming I do, another is to set the thumb throttle to a continuous medium power level so that an inexperienced rider can't burn the motor out by holding the throttle down at a stop.

Bonus Material!  An updated "Operating Tips for Owners"
In the earlier DIY post I finished by copying the 2 pager handout of tips.  The handout has since been redone 4 times for the parts I'm using, here is the latest version:

As with any bike, please check tire pressures, the brakes, and take a quick look for any problems before going out on a ride.  The chain should be lubricated at least every several hundred miles depending on riding conditions.

The Bafang BBS02 motor is a globally proven design with several million produced, and is on it's third version with robust gear and electrical improvements.  10 display styles are available, I use a P850C display.
-It is 750 Watts (the legal limit in New Hampshire and below the 1000 W limit in VT) and 48 Volts
-It has both a cadence sensor (about 1/4 turn of the pedals to activate) and a thumb throttle for turning on the motor
-There are switches on the brake levers to be sure the motor shuts off in an emergency situation

The downtube style lithium battery is removable with a water resistant plastic case.  It has a quality Seiko battery management system (BMS) that monitors the charge levels of the Samsung brand cells to balance them, and also provides short circuit and low voltage protection.
-The battery size is 48 volts by 17.5 Amp hours, or 840 Watt hours
-An extra water bottle mount has been installed on the downtube to strengthen the battery attachment.

-Order a 46 tooth front chainring for 26 inch wheels to provide a normal pedaling cadence range, maxxing out around the legal e-assist limit of 20 mph.  The rear cassette or freewheel should be a wide range 11 or 12 tooth top gear to a 32 or 36 tooth low gear size range to have a good gear for all situations.
-Test rides that I've taken have averaged around 15 Watt hours per mile.  This gives a range of about 50 miles with an 840 Watt hour battery (rated capacity less a 10% safety factor, divided by an average 15 Watt hours per mile).  Your range will probably be different depending on factors such as how much you pedal, heavy loads, hills, wind, etc.
-The 2 Amp charger takes 10 minutes of charging time for every mile traveled.  This is about 9 hours to charge a completely empty battery.
-There are 10 displays available for the BBS02 motor, I use the P850C model because it has the most info for the best price, has a USB port for phones or GPS devices, has a light switch with auto dimming built in, and has one of the largest and easiest to read displays.

Bicycle operating tips:
Keep your cadence between 60 to 90 rpm, (which is the normal recommended range for regular bicycling).  The motor is more efficient the faster it is running, and it will turn all the way up to 120 rpm.  Don't pedal slowly with the motor doing all the work, because when the motor is turning slowly it is not moving you down the road and most of the energy going into it is coming out as heat, not as a rotating shaft doing work, and this heat could burn the motor out.  Shift down for hills just like on a regular bike to keep your cadence in the regular bicycling range, and the motor will also be in a good speed range.

The thumb throttle is great for getting rolling under difficult circumstances, such as getting started at an uphill intersection, and (just like a regular bike) it works much better if you have remembered to shift down to a lower gear before you stop.  Note that using the thumb throttle will reduce your range.

Battery operating tips:

The battery will last the longest if you keep it charged in the middle of it's range, and don't go below 10% or above 90%.  It's best if you store it half full or a little above that, and keep it in a cool (but not below freezing) place.  Charging it fully a day ahead of a ride is fine, but keeping it sitting there over a long storage period all the way full or all the way empty eventually causes chemical changes inside it that will shorten it's life.  With poor storage the battery will last a year or two, with good storage it can last 4 to 5 years.

If you want to keep the battery charged enough for a spontaneous ride, then storing it at 3/4 full is OK, just not as good as 50% to 65% full.  A battery of 17.5 Ah at 48 volts, (840 Wh), is on the larger side and there is room within it's capacity to run it at less than a full charge for making several smaller trips before recharging.

Don't charge below freezing.  The electrolyte inside the battery is similar to water, and doesn't work very well below freezing.  Never charge the battery below freezing because the thick electrolyte can trap chemical reactions in small spots in the battery and damage it.  It is OK to ride below freezing, (down to around 0 F) because the battery is releasing energy when it is discharging and this helps keep the electrolyte moving around.  However the electrolyte is sluggish when discharging below freezing and as a result the battery will have less power and range.

If you want to monitor your battery more exactly than on the bike's display, there are DC meters available with 4 functions (Volts, Amps, Watt Hours, and Time) that can be spliced in between the motor and battery.  A second way of monitoring is to use a Kill A Watt household appliance meter when charging the battery.  However this measures after the ride not during it, and it is less accurate because you will need to figure in about a 10% to 15% loss due to efficiency of the charger, (the battery is getting 85% to 90% of what the Kill A Watt meter reads for Watt hours.)  For example if the Kill A Watt meter reads 0.10 kWh (100 Wh) when the charger finishes and the light turns green, then about 85 Wh went into the battery and 15 Wh were lost inside the charger.  You can divide this 85 Wh by the number of miles you rode to find out your Wh per mile.